 LinkLabel Control:The LinkLabel is new for .NET and it's a control that provides access to the Web and is a standard feature of many Windows applications. You’ll use the LinkLabel control to display text on a Visual Basic form that looks and acts just like an Internet link. When you combine the LinkLabel control with the Process.Start method, you can quickly open links on your form using Internet Explorer.
CheckBox Control: Use the CheckBox control to allow the user to select a true or false state. Individual CheckBox controls provide greater control over layout. You can select the CheckBox on and off during run time. The CheckBox1_CheckedChanged event procedure runs only if the user clicks in the first check box object. The event procedure is used with the If…Then decision structure. The CheckState property holds a value of 1 if there’s a check mark present and 0 if there’s no check mark present. Having a discount used as a check box is an example of how an application can use a CheckBox control.
RadioButton Control: when the RadioButton control is clicked, its Checked property is set to true and the Click event handler is called. The CheckedChanged event is raised when the value of the checked property changes. When the RadioButton button is selected all others in the group are automatically cleared. This property is usually only set to false when validation code is used to make sure the RadioButton selected is an allowable option. The text displayed within the control is set with the Text property, which can contain access key shortcuts. Selecting an option like male or female, or an age group which determines an option from a group is an example of how the RadioButton can be used.
GroupBox Control: Windows Forms' GroupBox control is used with other controls like the RadioButton or CheckBox controls to group boxes to subdivide a form by function. Grouping all options in a group box gives the user logical and visual elements for a clear user interface. To work GroupBox control you must first place the GroupBox control on the form and then drag the other controls (RadioButton or CheckBox) inside the GroupBox control. You will notice as you move the GroupBox control that all other controls inside the GroupBox control will move with it (other controls will stay inside the GroupBox control).
Example Problem 7 (The Basketball Tickets Program):
Example Problem 7 (The Basketball Tickets Program): This is a simple program that will use the IFTHENELSE structure to find a person's total price for purchase of basketball tickets. This program will also use the following controls: LinkLabel, CheckBox, GroupBox and RadioButton controls. An example of the form is given below with the supporting code. Please follow the steps below in creating this program. Please remember to place your name somewhere at the bottom of this form. In addition, please review how the ToString("c") is applied with the written code. Save the program as Example 7 and put the form and code stapled together and turn in.
Step 1 (placing the controls on the form):
Step 2 (Changing each control's properties):
Step 3 (Writing the code):
1. Place the FlowerBox and Global variable in the code. To bring the code up without clicking on any controls, just click on the View Code button in the Solution Explore window. Complete the steps as show below:
Flowerbox template:
1. Load up Visual Basic .NET and create a new project Save the program as Example 7.
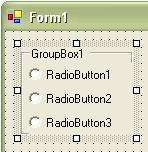
2. Place a GroupBox Control on the Form as shown:

3. Place three RadioButton Controls on the Form in side the GroupBox Control as shown:
6. Finally, finish up the bottom half of the form by placing three Buttons, two more Labels and a LinkLabel Control on the Form as shown:
4. Then place two CheckBox Controls on the Form to the right of the GroupBox Control as shown:

5. Next, place two Labels and two TextBox Controls on the Form also to the right of the GroupBox Control as shown:


The Form below shows what the form should look like. You will use the Text properties to change each control on the Form: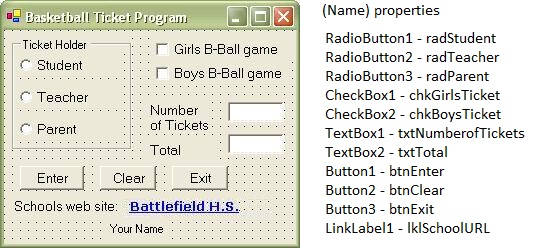
The major part of the code will be written within the Button1 control, which is the Enter Button. But, you will need to place some code commands inside the RadioButtons and you will also use a Global variable outside of a specific event procedure at the top of the code window. It is good practice to place all Global variables right below the FlowerBox of the code. In short, the purpose of a Global variable is that Visual Basic .NET allows that variable type to be used with other event procedures as shown in this program code. Both the RadioButtons and Button1 will use the variable "discount" within each of their event procedures.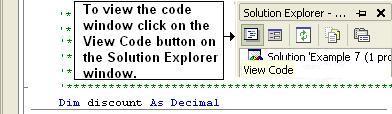
 [ Flower Box ]
2. Next, you will assign each of the RadioButton controls a code that will define each of their event procedures for each of the options when they are selected during run time. You will click on each of the RadioButtons (RadioButton1, RadioButton2, and RadioButton3) and place a value for discount (the variable "discount" had just been assigned as a Global variable above). Again, you must write the code within each Private Sub for each RadioButton. Simply triple click each RadioButton on the Form and the program will pull in each of the Private Sub event procedures. Once you click on each RadioButton (on your Form) review and complete the steps as shown below. Notice that each RadioButton will have a different value for discount. 
3. Now it's time to write the code for the calculations on purchasing the tickets. This event procedure will occur within the Button1 control. So again, simply triple click on the Button1 control so the program will pull in the Private Sub for the Button1 control. Once you click on the Button1 (on your Form) review and complete the steps as shown below. You will notice that the code has two IFTHENELSE control structures. This structure is testing each of the two CheckBoxes. For each of the IFTHENELSE statement the program will test to see if the CheckBox1 or CheckBox2 property is equal to 1. A test occurs in both and if the test is true, a calculation occurs but if the test is false then a variable will be equal to 0. Remember, if a check mark is made during run time the value of a CheckBox will be 1. Also notice at the bottom of the event procedure the use of the ToString("c") function. Visual Basic .NET uses this to format your output to represent currency. 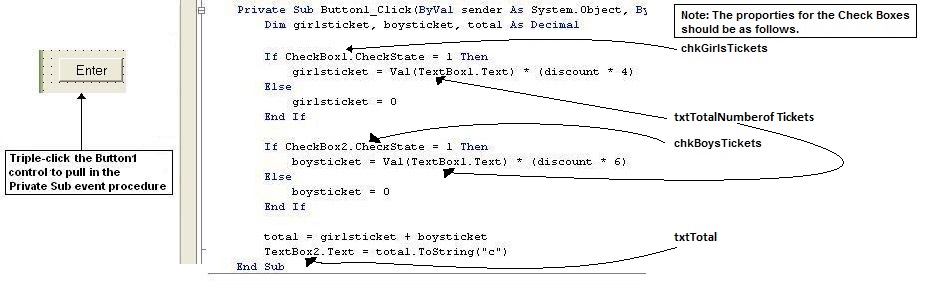
4. This code should be pretty much straight forward. Bring forth both of the Button2 and Button3 controls and complete the code to clear all of the controls during run time and exit the program. Please review the correct commands given to each of the RadioButtons and CheckBoxes which will clear these controls during run time. 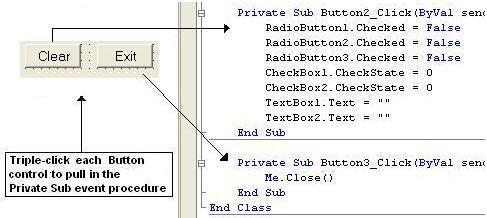
5. The last code that needs to be completed is the LinkLabel. Again, simply triple click on the LinkLabel control and complete the code to create a hyper link on your form. Please review the commands of this event procedure as shown below:
The Desk Check - You will see three different desk check below. Once your program is running try to enter in the inputs to capture the output and screen shots for each of these example problem desk checks.
Desk Check 1:
Ticket Holder Student
Girls Basketball Game: Check
Number of Tickets: 2
Desk Check 1:
Ticket Holder Parent
Girls Basketball Game: Check
Boys Basketball Game: Check
Number of Tickets: 3
Desk Check 3:
Ticket Holder Parent
Girls Basketball Game: Check
Boys Basketball Game: Check
Number of Tickets: 1
Directions for turning in Example Problem - In the classroom: In this example problem you will have a print code and the screen shot (snipping Tool) for Example Problem 7. Once you get this output try to use the Snipping program to copy the screen shots and put it in a Word Document.
You will need a few screen shots of the
Program Form - making a few different test.
Program Code
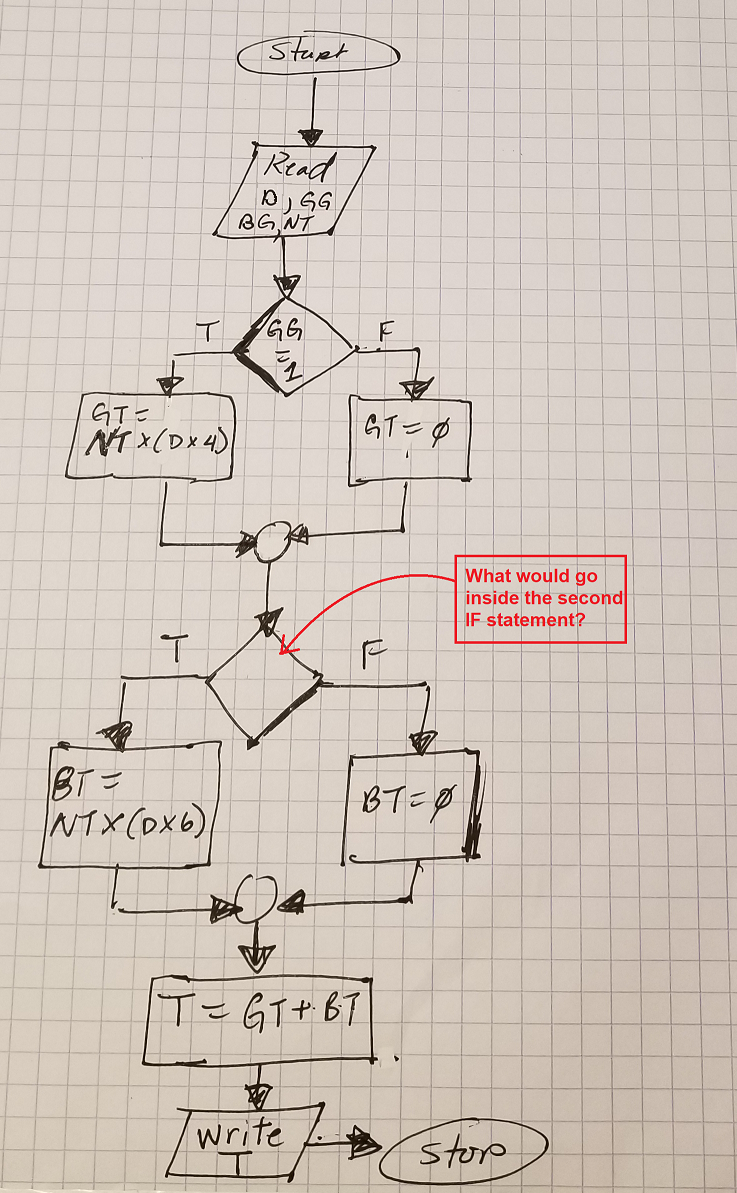
Flowchart of the Enter Button
Directions for turning in Example Problem 7 - Virtual: Virtual No Printing just upload the assignment files to Canvas Module 3 Example Problem 7. You will NOT need to print out any documents just submit this example problem in the Canvas drop box. Note you should have three screen shots: Example 7 Code, the Form (Run Time screen) and the Flowchart. Put all screen shots (images) in a Word Document and send me the file. Save the Word document as the example problem: Example 7 and your first and last name.
Please note, that you will need to re-save this file as a pdf file before uploading. Here is an example video on how to do that: See Video > > > How to save a Word file to a pdf right click mouse and select... (Open link in new tab)