Adding a BindingNavigator control to a form and binding it to a data source, such as a BindingSource, will automatically establish the relationships in this table. All the constructors for BindingNavigator call the AddStandardItems method to associate the standard set of UI controls with the navigation toolbar. Use one of the following techniques to customize this toolbar:
|
UI Control |
BindingNavigator member |
BindingSource member |
|
Move First |
MoveFirstItem |
MoveFirst |
|
Move Previous |
MovePreviousItem |
MovePrevious |
|
Current Position |
PositionItem |
Current |
|
Count |
CountItem |
Count |
|
Move Next |
MoveNextItem |
MoveNext |
|
Move Last |
MoveLastItem |
MoveLast |
|
Add New |
AddNewItem |
AddNew |
|
Delete |
DeleteItem |
RemoveCurrent |
Adv. Programming - Notes on BindingNavigator Control: Example Problem #9 Simulation:
Example 9 - In this example problem, you will modify the Example 8 that you already created. This modified application will allow the user to use a Navigator bar (in BindingNavigator control) that will display each record contained in the dataset, one record at a time.
So, to start you must make a copy of Example 8 and rename it to Example 9 or you may just continue building Example 8 by adding the steps that are need to enhance this program. Review the steps below:
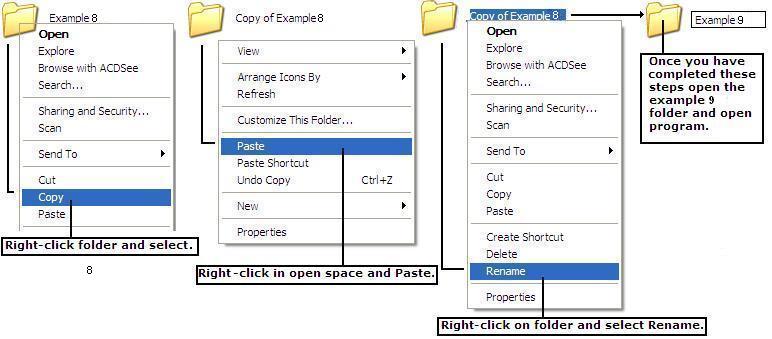
Once you have created Example 9 load-up the Example 9 program. You will not delate any of the present controls. All that you will need to do is add the BindingNavigator control at the top of the form and bind the source to the date and that is it.
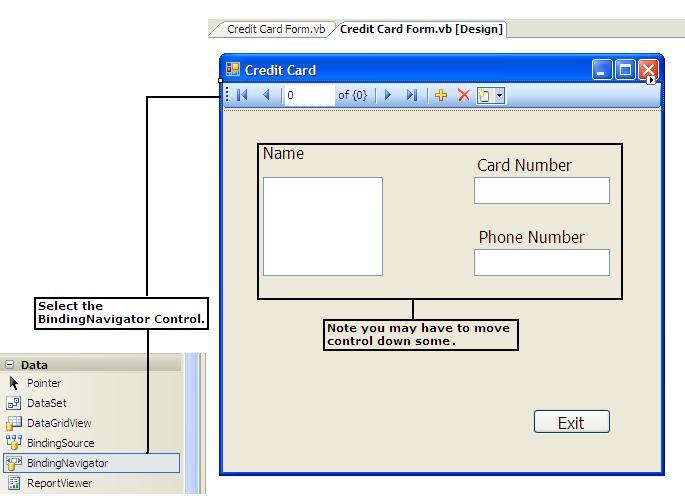
1. With the project open select the BindingNavigator control and drag this object to the Form and place it at the top. Take note that you may have to move the other control down some to make room for the BindingNavigator control. The computer will add this bar to the top of the Form window. You should also note that their are now four different objects within the component tray: DataSet, a BindingSource, a TableAdapter, and a Binding Navigator.
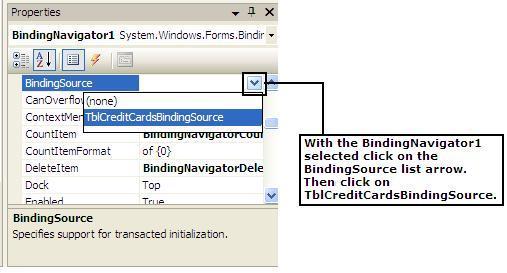
2. The next step is to work with BindingSource property to bind the BindingNavigator control to the DataSet Object. If not select the BindingNavigator control on the form. Click the BindingSource properties and click on the list arrow. This will open up a window where you will need to select TblCreditCardsBindingSource. Once this step has been complete you have bound the data to the BindingNavigator Control. There is no code that has to be written. Simply run the program and review and test the buttons on this control to see and view what happen to each button on this BindingNavigator Contro.
Directions for turning in Example problem - In the classroom: In this example problem you will have a print code and printed console output screen for Example problem 9. Put Example Problem 9 code on top followed by Form print out - stapled together.
Directions for turning in Example problem - Virtual: Virtual No Printing just upload the assignment files to Canvas Module 3 Example Problem #9. You will NOT need to print out any documents just submit this example problem in the Canvas drop box. Note you should have two screen shots: Example 9 code, and Form output. Put all screen shots (images) in a Word Document and send me the file. Save the Word document as the Example problem: Example Problem 9 and your First and Last name.
Teacher's Comments: Believe it or not you do not have to make any changes to the code except for the Flowerbox. Simply change the file name to Example 9. Since you have already bound the data to the program in Example 8 there are no changes to the code. Run the program and try to filter through the Credit cards and notice the changes within the text boxes Card Numbers and Phone Numbers. Please turn in the Form and code together.