|
1. Click the Start button. 2. Select All Programs. 3. Select the Microsoft Visual Studio menu option. 4. Select Microsoft Visual Studio on the submenu to start the application. |

|
|
5. When the application opens you will see a Start page similar to the below figure. This Start page will have many options. You will also have a Solution Explorer, Properties Window, and a Toolbox. None of the windows and controls are active until you either load-up or start a new project. Visual Studio sports a new and improved Start Page that enables users to create new projects, find online resources, and configure their Visual Studio profile. Moreover, the Start Page provides quick links to options for asking questions, sending feedback, and searching for samples and controls across the Web. We will start programming without an interface of a form, through the use of the Console Application. Then the class will move onto more event driven programming. The following steps will guide you through in getting Visual Basic started throught programming with the Console Application. |

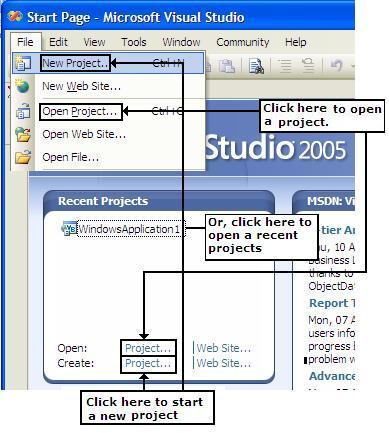
| 6. Once Visual Studio .NET is opened on the Start page, you will see many things on the start page. To start or open a new project, can be done many ways. The image to the right will highlight and show ways to open a new project. You will find that there is more than one way to complete tasks. I find when trying to open projects may be just as easy to open My Computer and launch and open the project from your own files. |
|
|
7. This will bring up a New project dialog window which you will see a Project Type windows and a Template windows. Please be aware that when you take steps to open a new project in .NET it will force you to save the application before you can do anything. The image that you see below is what the “New Project” dialog window will look like. You will take steps to give the file a name and a location for this new project. When saving, you will see that .NET will place a folder (with the file name) and will have many files inside this folder. The actual programs will be placed inside this folder. By selecting the check box on this window this will make sure your project is placed in a folder. 8. Please select the Console Application (in the Templates list). Note programming with the console application does not include forms or other user interface elements. |

9. Key in the file name Hello World (in the Name box) and select your location using the browser button.
Try to save all work to the A: drive onto your classroom computer disk.
10. Verify your file name and location (A: drive) and then click OK. At this point you are ready to start entering and coding your programs.
11. Visual Studio will now create a file called "Hello World.vb" that should look as follows:
Structure of a Visual Basic Program: A Visual Basic program has standard building blocks. Visual Basic code is stored in project modules. Projects are composed of files, which are compiled into applications. When you start a project and open the code editor, you see some code already in place which will be the default procedures put into place (AS SHOWN ABOVE). Any code that you write will be applied within the Module.
